> ## Documentation Index
> Fetch the complete documentation index at: https://docs.slickerhq.com/llms.txt
> Use this file to discover all available pages before exploring further.
# Stripe Billing
> Learn how to connect Stripe Billing to Slicker
### Prerequisites
Slicker integrates with Stripe via an API key. Creating a Stripe API key requires a Stripe user enough permissions to do so.
Stipe user roles that have this permission include `Administrator`, `Super Administrator`, and `Developer`.
### (Option 1: Stripe Marketplace App) Integerate via the Stripe Marketplace
1. Go to the [Slicker App page in the Stripe Marketplace](https://marketplace.stripe.com/apps/slicker).
2. Click on the `Install` button.
3. Follow the instructions to authorize Slicker to access your Stripe account.
4. Once authorized, you will be able to use click the `Link` button in the Slicker app page to link your Stripe account to your Slicker instance.
### (Option 2: API Key) Create credentials
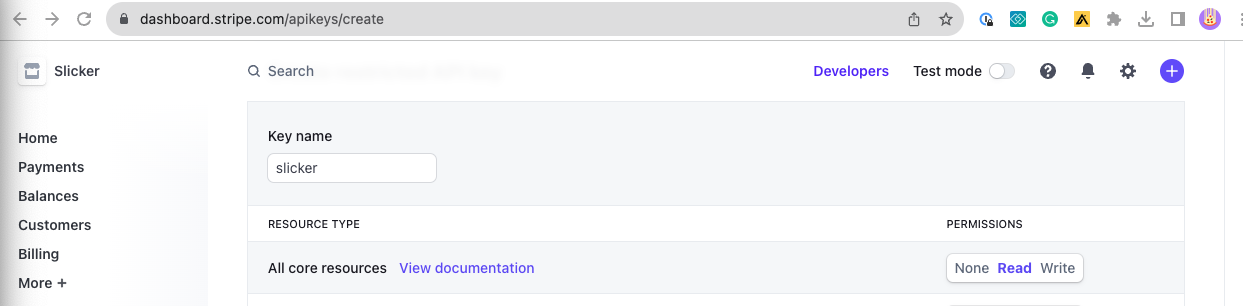
1. Go to the Stripe dashboard to create a new restricted API key [here](https://dashboard.stripe.com/apikeys/create).
2. Give the key a name like `Slicker`.
3. For permissions select the following:
* `Read` on `All core resources`
 * `Read` on `All Connect resources`
 * `Read` on `All Reporting resources`
 * `Read` on all `Billing` resources, with `Write` on `Invoices`.
The `Write` permission on `Invoices` is required for Slicker to retry failed transactions and recover revenue.
* `Read` on all `Billing` resources, with `Write` on `Invoices`.
The `Write` permission on `Invoices` is required for Slicker to retry failed transactions and recover revenue.
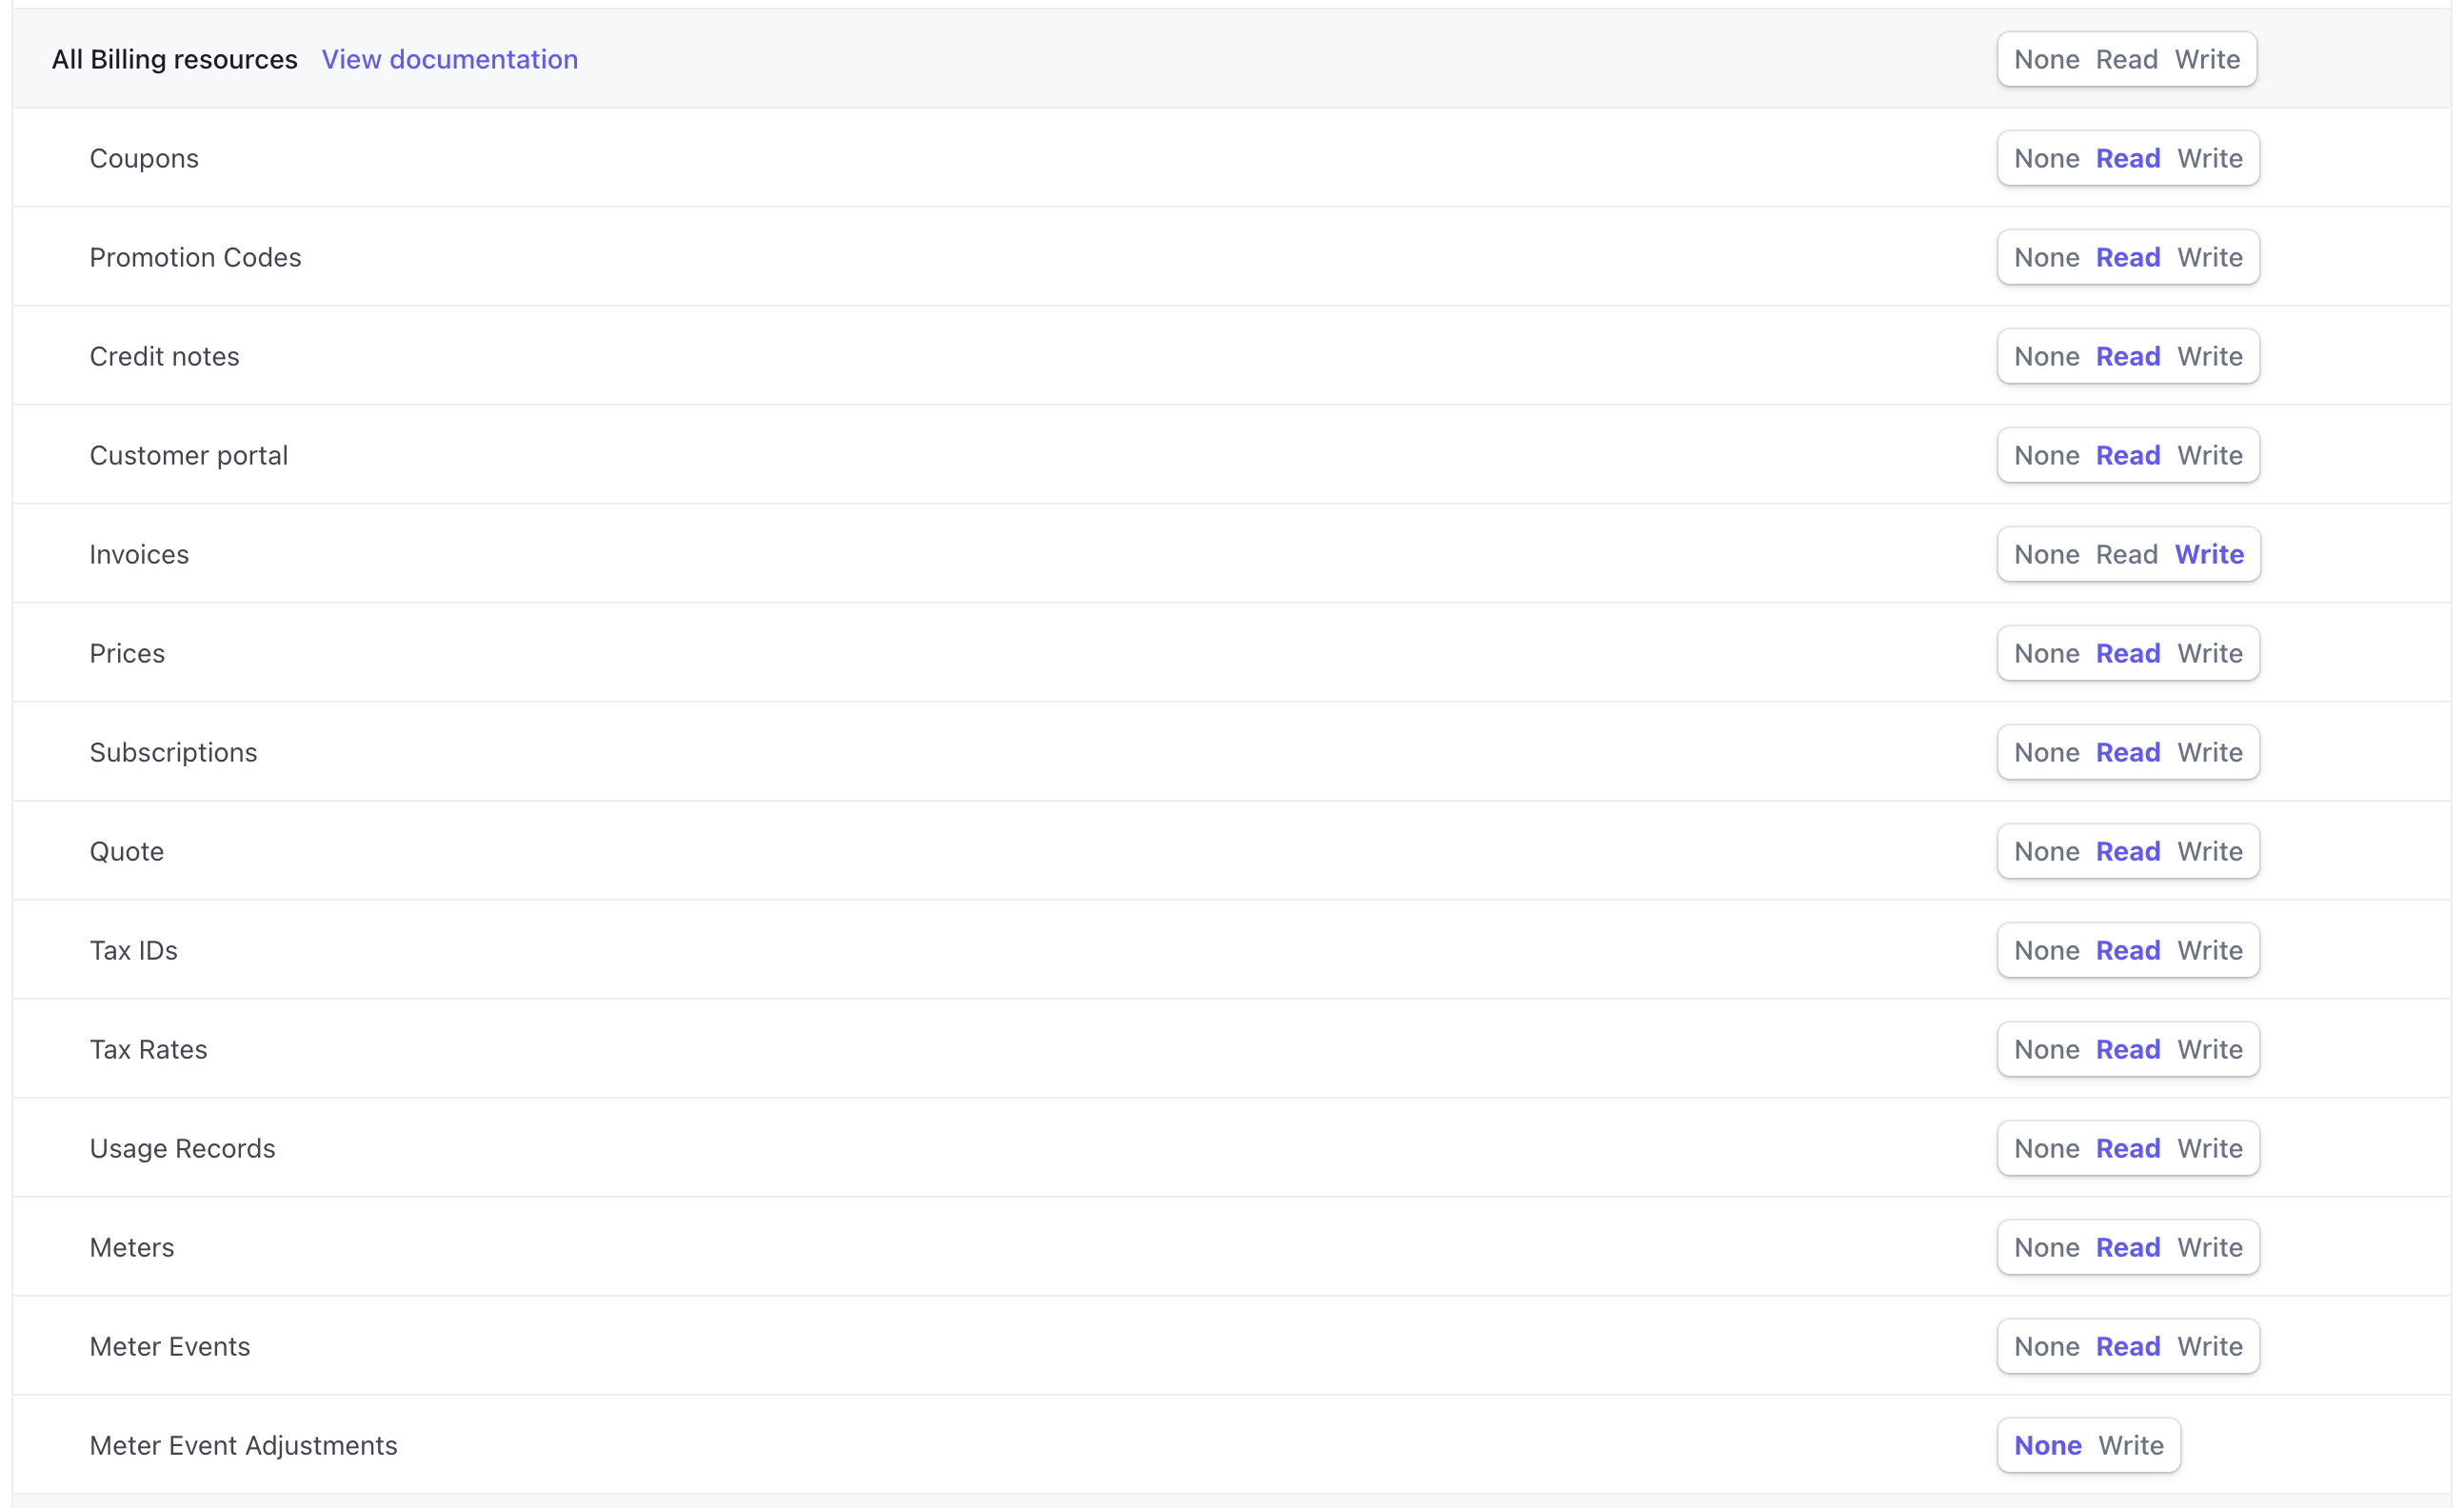 * *(Optional)* `Write` on `Subscriptions`.
Add `Write` on `Subscriptions` only if you want Slicker's [Grace Period Manager](/essentials/grace_periods) to cancel subscriptions when their grace period ends. Marking invoices uncollectible is already covered by the `Write` on `Invoices` permission above. Cancelling subscriptions is the one grace-period action that needs this extra scope.
4. Click the `Create key` button. If prompted confirm your password. Copy the generated key - we will need it later.
### (Option 2: API Key) Create integration in Slicker
1. Go to the Slicker's [new integration page](https://app.slickerhq.com/integrations/new).
2. Select `Stripe` from the list of integrations.
3. Give the integration a name and description to help you identify it later.
4. Enter the API key you copied earlier.
5. Make sure to select this integration is for Stripe Billing. Otherwise, Slicker will only sync payment data, without managing failed billing attempts.
* *(Optional)* `Write` on `Subscriptions`.
Add `Write` on `Subscriptions` only if you want Slicker's [Grace Period Manager](/essentials/grace_periods) to cancel subscriptions when their grace period ends. Marking invoices uncollectible is already covered by the `Write` on `Invoices` permission above. Cancelling subscriptions is the one grace-period action that needs this extra scope.
4. Click the `Create key` button. If prompted confirm your password. Copy the generated key - we will need it later.
### (Option 2: API Key) Create integration in Slicker
1. Go to the Slicker's [new integration page](https://app.slickerhq.com/integrations/new).
2. Select `Stripe` from the list of integrations.
3. Give the integration a name and description to help you identify it later.
4. Enter the API key you copied earlier.
5. Make sure to select this integration is for Stripe Billing. Otherwise, Slicker will only sync payment data, without managing failed billing attempts.
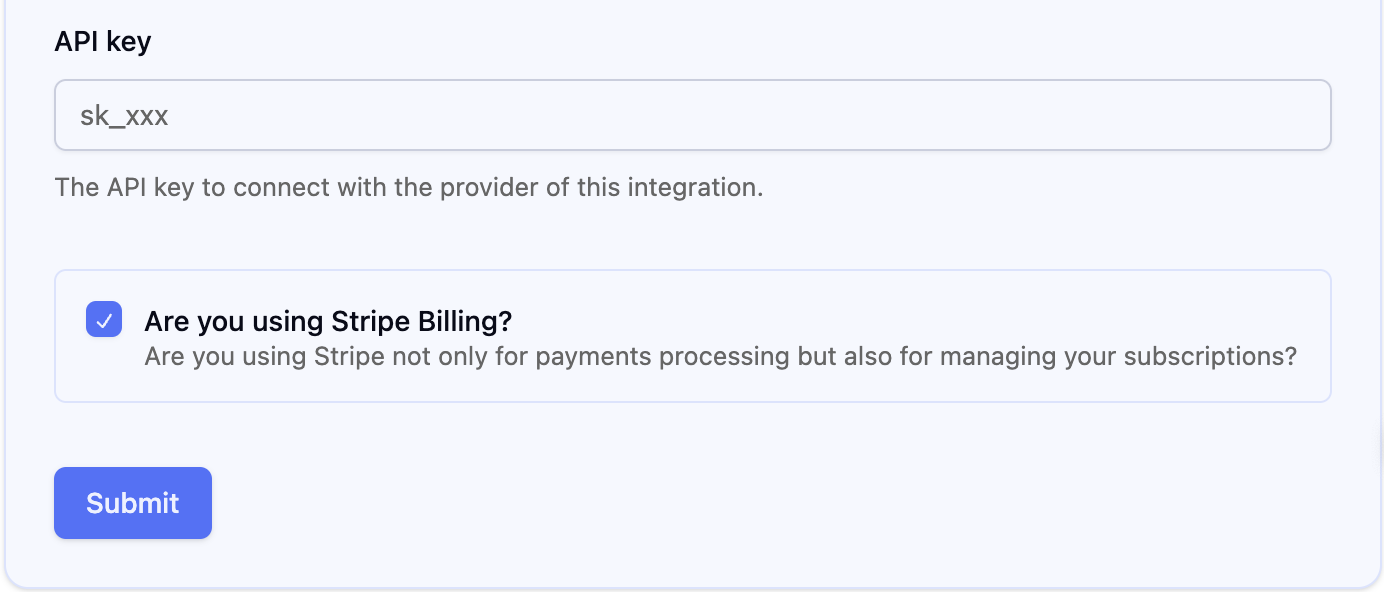 6. Click the `Submit` button to create the integration.
### (Optional) Enable real-time webhooks
By default Slicker keeps your data in sync by polling the Stripe API on a schedule. Adding a webhook lets Stripe push changes to Slicker the moment they happen, for near real-time recovery tracking. For Stripe Billing this is especially valuable: Stripe's API has no "updated since" filter for invoices and subscriptions, so webhooks are the most reliable way to capture later status changes — a payment that finally succeeds, an invoice that's voided, a subscription that cancels — as soon as they occur.
Webhooks are configured **per Stripe account**, in that account's own Stripe Dashboard. They're optional and can be added at any time after the integration is created.
1. In your Slicker integration settings, turn on **Webhooks** and copy the **Webhook URL** Slicker shows you. This URL is unique to your integration.
2. In the [Stripe Dashboard](https://dashboard.stripe.com/webhooks), go to **Developers → Webhooks** and click **Add endpoint**.
3. Paste the Slicker Webhook URL into the **Endpoint URL** field.
4. Under **Select events**, subscribe to **only the events Slicker uses** (below). You can pick **All events** to get started, but on high-volume accounts we recommend selecting just these — Slicker ignores anything else, so extra events are only wasted webhook traffic:
* **Invoices** — `invoice.created`, `invoice.finalized`, `invoice.updated`, `invoice.paid`, `invoice.payment_succeeded`, `invoice.payment_failed`, `invoice.payment_action_required`, `invoice.marked_uncollectible`, `invoice.voided`
* **Subscriptions** — `customer.subscription.created`, `customer.subscription.updated`, `customer.subscription.deleted`, `customer.subscription.paused`, `customer.subscription.resumed`
* **Payments** — `payment_intent.succeeded`, `payment_intent.payment_failed`, `payment_intent.processing`, `payment_intent.requires_action`, `payment_intent.canceled`
* **Customers** — `customer.created`, `customer.updated`, `customer.deleted`
5. Click **Add endpoint** to save it.
6. Open the endpoint you just created, reveal its **Signing secret** (it starts with `whsec_`), and copy it.
7. Back in Slicker, paste the signing secret into the **Webhook Signing Secret** field and save.
Copy the **signing secret** (`whsec_…`) — not your API key (`sk_`/`rk_`) or the endpoint ID. If you ever rotate the secret in Stripe, update it in Slicker too.
### (Optional) Let Slicker manage the grace period
Slicker's [Grace Period Manager](/essentials/grace_periods) keeps recovering failed payments on your own schedule and decides what happens when that window ends. There are two things to set up: turn the grace period settings on in Slicker, and stop Stripe from ending the subscription itself.
The order does not matter. Slicker measures each grace period from the invoice's first failed payment, not from when you turn the feature on, so if you switch Stripe to leave invoices overdue first, they simply wait until Slicker takes over. Its next run then closes anything already past its grace period, so the backlog is handled either way.
#### Turn on grace period management in Slicker
In your Slicker integration settings, enable the grace period manager, then set the grace period length and the actions to apply when it expires.
6. Click the `Submit` button to create the integration.
### (Optional) Enable real-time webhooks
By default Slicker keeps your data in sync by polling the Stripe API on a schedule. Adding a webhook lets Stripe push changes to Slicker the moment they happen, for near real-time recovery tracking. For Stripe Billing this is especially valuable: Stripe's API has no "updated since" filter for invoices and subscriptions, so webhooks are the most reliable way to capture later status changes — a payment that finally succeeds, an invoice that's voided, a subscription that cancels — as soon as they occur.
Webhooks are configured **per Stripe account**, in that account's own Stripe Dashboard. They're optional and can be added at any time after the integration is created.
1. In your Slicker integration settings, turn on **Webhooks** and copy the **Webhook URL** Slicker shows you. This URL is unique to your integration.
2. In the [Stripe Dashboard](https://dashboard.stripe.com/webhooks), go to **Developers → Webhooks** and click **Add endpoint**.
3. Paste the Slicker Webhook URL into the **Endpoint URL** field.
4. Under **Select events**, subscribe to **only the events Slicker uses** (below). You can pick **All events** to get started, but on high-volume accounts we recommend selecting just these — Slicker ignores anything else, so extra events are only wasted webhook traffic:
* **Invoices** — `invoice.created`, `invoice.finalized`, `invoice.updated`, `invoice.paid`, `invoice.payment_succeeded`, `invoice.payment_failed`, `invoice.payment_action_required`, `invoice.marked_uncollectible`, `invoice.voided`
* **Subscriptions** — `customer.subscription.created`, `customer.subscription.updated`, `customer.subscription.deleted`, `customer.subscription.paused`, `customer.subscription.resumed`
* **Payments** — `payment_intent.succeeded`, `payment_intent.payment_failed`, `payment_intent.processing`, `payment_intent.requires_action`, `payment_intent.canceled`
* **Customers** — `customer.created`, `customer.updated`, `customer.deleted`
5. Click **Add endpoint** to save it.
6. Open the endpoint you just created, reveal its **Signing secret** (it starts with `whsec_`), and copy it.
7. Back in Slicker, paste the signing secret into the **Webhook Signing Secret** field and save.
Copy the **signing secret** (`whsec_…`) — not your API key (`sk_`/`rk_`) or the endpoint ID. If you ever rotate the secret in Stripe, update it in Slicker too.
### (Optional) Let Slicker manage the grace period
Slicker's [Grace Period Manager](/essentials/grace_periods) keeps recovering failed payments on your own schedule and decides what happens when that window ends. There are two things to set up: turn the grace period settings on in Slicker, and stop Stripe from ending the subscription itself.
The order does not matter. Slicker measures each grace period from the invoice's first failed payment, not from when you turn the feature on, so if you switch Stripe to leave invoices overdue first, they simply wait until Slicker takes over. Its next run then closes anything already past its grace period, so the backlog is handled either way.
#### Turn on grace period management in Slicker
In your Slicker integration settings, enable the grace period manager, then set the grace period length and the actions to apply when it expires.
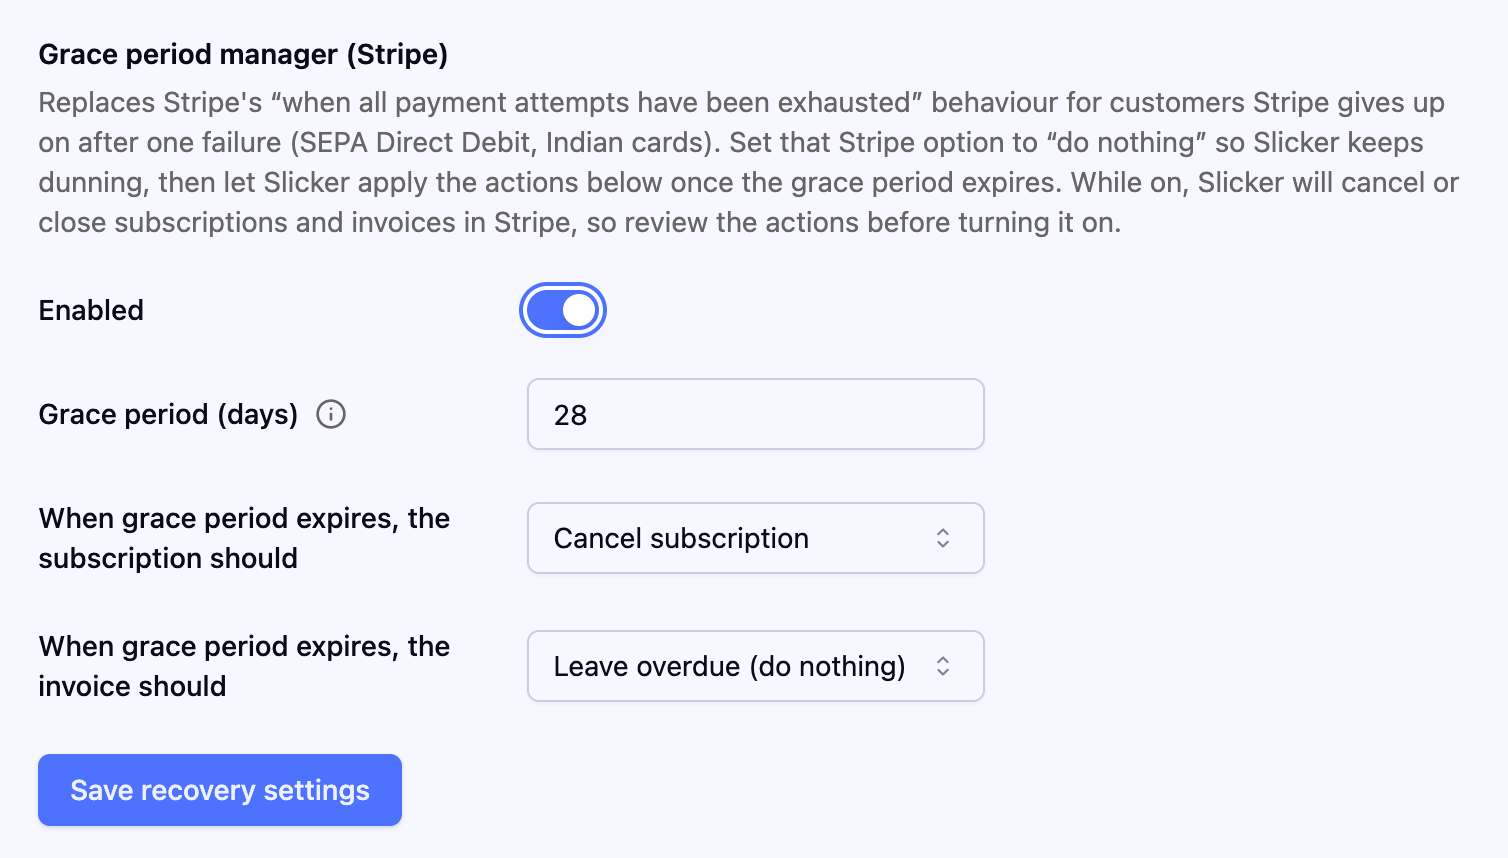 If you do not see these settings, [let us know](https://www.slickerhq.com/contact) and we will enable the feature for your account.
#### Turn off Stripe's automatic cancellation
Stop Stripe from ending the subscription itself, so Slicker owns the recovery window. Otherwise Stripe cancels or writes off the invoice once its own retries run out, before your grace period is up.
1. Open your Stripe [retries and recovery settings](https://dashboard.stripe.com/revenue-recovery/retries).
2. Set every failed-payment outcome to leave the invoice overdue. Do not cancel the subscription, mark it unpaid, or mark the invoice uncollectible.
If you do not see these settings, [let us know](https://www.slickerhq.com/contact) and we will enable the feature for your account.
#### Turn off Stripe's automatic cancellation
Stop Stripe from ending the subscription itself, so Slicker owns the recovery window. Otherwise Stripe cancels or writes off the invoice once its own retries run out, before your grace period is up.
1. Open your Stripe [retries and recovery settings](https://dashboard.stripe.com/revenue-recovery/retries).
2. Set every failed-payment outcome to leave the invoice overdue. Do not cancel the subscription, mark it unpaid, or mark the invoice uncollectible.
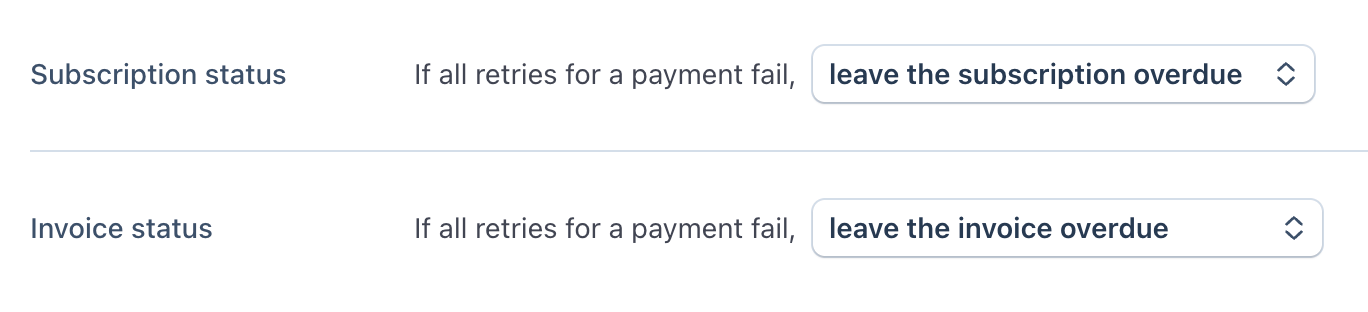 With Slicker managing the grace period and Stripe set to leave invoices overdue, Slicker applies the end-of-grace action you choose. Cancelling subscriptions also needs the optional `Write` on `Subscriptions` permission described above.
### Troubleshooting
On integration creation, Slicker will attempt to connect to Stripe using the provided API key.
If the connection fails, you will see an error message like the one below.
Please double-check the API key, make sure it has the correct permissions, and try again.
With Slicker managing the grace period and Stripe set to leave invoices overdue, Slicker applies the end-of-grace action you choose. Cancelling subscriptions also needs the optional `Write` on `Subscriptions` permission described above.
### Troubleshooting
On integration creation, Slicker will attempt to connect to Stripe using the provided API key.
If the connection fails, you will see an error message like the one below.
Please double-check the API key, make sure it has the correct permissions, and try again.
